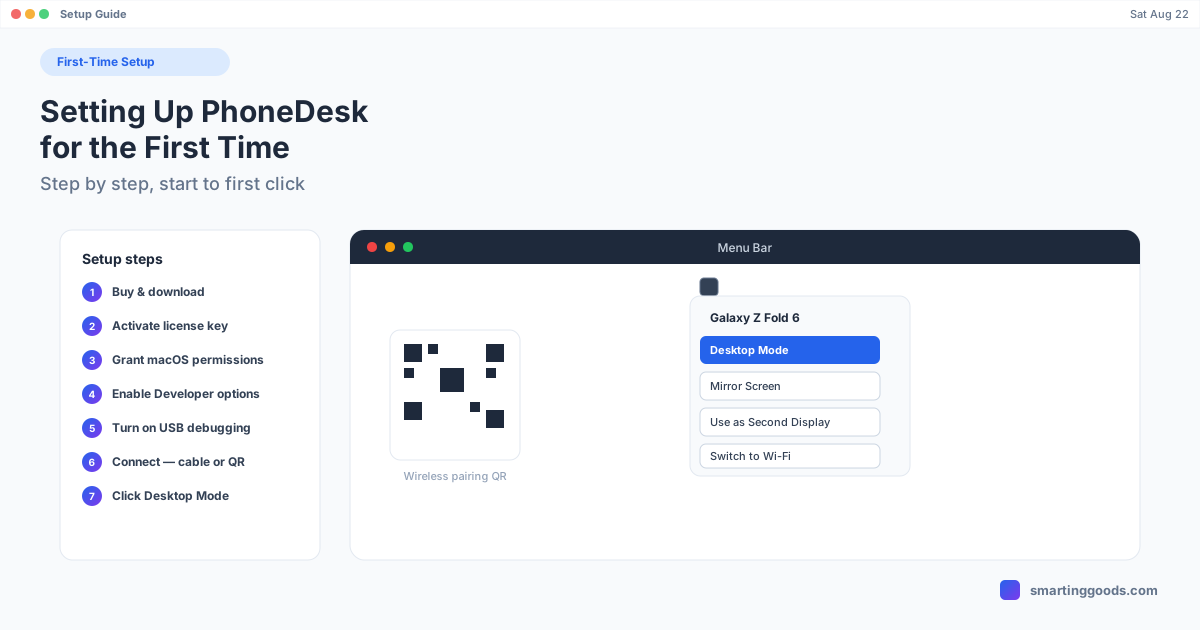
Setting Up PhoneDesk for the First Time: A Walkthrough
A clear, accurate walkthrough of PhoneDesk's real setup flow — purchase, license activation, macOS permissions, and connecting your phone — no invented screenshots.
Setting Up PhoneDesk for the First Time: A Screenshot Walkthrough
We're not going to fabricate exact screen-by-screen UI copy here — apps get UI tweaks between versions, and pretending to describe an exact dialog box you haven't seen is how guides go stale and inaccurate. What follows is accurate to PhoneDesk's documented setup flow: what you'll actually need to do, in order, and what to expect at each stage.
Before you start
PhoneDesk needs macOS 13 or later. It's a signed and notarized app distributed through the normal macOS installer flow, and it ships with adb and scrcpy bundled in — there's nothing extra to install separately on the Mac side, no Homebrew, no command line. On the phone side, you'll need an Android device; if it supports Samsung DEX (confirmed on Galaxy Z Fold 6) or Pixel's built-in desktop mode (confirmed on Pixel 9 Pro), you'll get the full desktop-mode experience — other Android phones will still connect for screen mirroring, second-monitor use, and file transfer.
Step 1: Buy and download
Buying gets you a license key by email along with a link to the current build — the download page always serves the latest version regardless of when you bought, since PhoneDesk auto-updates itself afterward through its built-in updater (Sparkle), signed and notarized, no Gatekeeper workarounds needed.
Step 2: Activate your license
PhoneDesk is fully gated until you activate the key from your purchase email — there's no free trial to skip through, which is part of why the purchase itself carries a 14-day no-questions refund. Activation is designed to work offline once you have the key. If you ever need to look your key up again, your license and download link are always available from the manage-order page using the email you purchased with.
Step 3: Grant the permissions macOS asks for
Because PhoneDesk needs to display and control content from a connected device, macOS will prompt you for a couple of standard system permissions the first time you use certain features — this is normal for any app that mirrors or streams a device's screen, not something specific to PhoneDesk being unusual. Approve the prompts when they appear; if you skip one, the feature it's tied to just won't work until you grant it, and macOS makes it easy to go back and approve it later from System Settings.
Step 4: Turn on Developer options on your phone
This is a one-time step per phone, done on the Android device itself, not in PhoneDesk:
- Open Settings → About phone
- Tap Build number seven times
- You'll get a confirmation that Developer options are now unlocked
Step 5: Turn on USB debugging
Still on the phone:
- Go to Settings → System → Developer options
- Enable USB debugging
Step 6: Connect your phone
You have two options here, and neither requires installing a driver on the Mac:
- Cable: Plug the phone into the Mac with a USB cable. PhoneDesk auto-discovers it — name, resolution, and Wi-Fi port are detected automatically.
- Wireless: Pair with a QR code or pairing code, generated straight from Android's own Wireless debugging screen under Developer options. No cable needed at all, even for first setup.
The first time you connect, PhoneDesk's companion app installs automatically on the phone — that's what powers the file and text transfer features later. Nothing to manually download or set up on the phone beyond that.
Step 7: Click Desktop Mode (or the feature you actually want)
From here, PhoneDesk lives in your Mac's menu bar as a dropdown, one entry per connected phone. Depending on what you're after:
- Desktop Mode opens your phone's DEX or Pixel desktop session as a resizable macOS window
- Mirror Screen mirrors the phone's display without the desktop-mode session
- Use as Second Display flips the direction — your Mac creates a real display and streams it to the phone, which then shows up in System Settings → Displays like any other monitor
- Switch to Wi-Fi moves an active USB connection over to wireless with one click
What to expect the first time
A few things worth knowing before you're surprised by them:
- If your phone's desktop mode is the DEX or Pixel kind, expect a small overlay on the phone's own screen while a Desktop Mode session runs — that's an Android platform requirement for desk-eligible displays, not a bug.
- Wi-Fi pairing won't survive a phone reboot — Android drops the wireless adb connection every time the phone restarts, so you'll reconnect over USB once, or re-pair with a QR code, after any restart.
- For the sharpest picture in second-monitor mode, open System Settings → Displays, turn on "Show all resolutions," and pick the highest one listed for PhoneDesk Display.
If something doesn't connect
Double-check USB debugging is actually toggled on (it's easy to tap through Developer options and miss it), and that you're using a cable capable of data transfer, not a charge-only cable, if you're going the USB route first. Beyond that, the manage-order page has your license details if you need to reference them, and the 14-day refund is there if setup genuinely doesn't work out for your phone or workflow.
Setup Is a One-Time Cost, Not a Recurring One
Once connected, everyday use is one click from the menu bar — no repeating this walkthrough. See the full feature list and buy PhoneDesk →
Frequently Asked Questions
Q: Do I need to reinstall or reactivate PhoneDesk on every macOS update? A: No — updates arrive automatically through PhoneDesk's built-in updater, and your license activation persists across app updates.
Q: Will I need to redo the phone-side setup (Developer options, USB debugging) every time? A: No, those are one-time toggles on the phone. What does need repeating after a phone reboot is the Wi-Fi pairing specifically, since Android clears that connection on restart.
Q: What if my phone doesn't support Samsung DEX or Pixel desktop mode? A: It will still connect for screen mirroring, second-monitor use, and file transfer over USB debugging — you just won't get the native desktop-mode windowed session, which is tied to phones that support DEX or Android's built-in desktop mode specifically.
Q: Is setup different for USB versus wireless? A: The phone-side steps (Developer options, USB debugging) are the same either way. For wireless, you pair using a QR code or pairing code from Android's Wireless debugging screen instead of plugging in a cable.
Q: What if I get stuck or it doesn't work for my phone? A: PhoneDesk has a 14-day no-questions refund, requested from the manage-order page or by replying to your license email.
Get Set Up
PhoneDesk is a $25 one-time license — no subscription. Full feature list and download →